Wednesday 5 October 2011

Jewellery making course

I recently started an evening course in jewellery making at Leeds College of Art and Design. So far I've only been to two lessons, but I'm already learning a lot. I'm not talking about putting beads on a thread here, but proper metal work.

Our first task is to make a ring made of copper. We've learned how to measure ring sizes with the help of a steel wire - this is important to get the right amount of material for the item you are making. You don't want the ring to get too small or too big! We've also learned annealing - which is a technique of heating up metal with the help of fire. After that we cleaned the copper in some kind of acid (I can't remember what it was called), followed by trying to bend the copper stick into a ring with some tongs. Easier said than done!
After having soldered it together we used a wooden hammer and a thick metal stick (the kind you use for making rings - I can't remember the correct term for that either) to make the ring perfectly round.
Next lesson we're gonna make the ring all shiny, and ready to wear. Exciting!

I've got my eyes on this jewellery book from Amazon. A girl in my class bought it, and it includes all the basic techniques you need to know, plus a lot more. There are lots of pretty pictures in it as well :) I really need to read up on the techniques, as I'm clueless about what the teacher is talking about sometimes. I blame it on the fact that I'm Swedish :P The book is only £13.97, so it's well worth it!

Wednesday 28 September 2011

Pencil portraits - My friends looking silly

Drawing faces is what I'm best at. I've always been fascinated with eyes especially, so drawing faces is kind of my thing. When I decided to draw portraits of my friends though, I thought; "Why draw them all pretty, when I can draw them making silly faces".
This is how it turned out...
"Activate before use"
It all started with a screen-cap of a video. This girl is really one of a kind. She was goofing around with an O2 SIM card sticker on her forehead (which was being filmed by her sister) and this wonderful shot inspired me to do a whole collection of drawings of my friends making silly faces.


"The imaginary fly on the nose"
She does have the biggest eyes I've ever seen. And she kind of looks like a living cartoon, I promise! ;)


"Finger-mustache"
He does actually have a real mustache-tattoo on his finger! ;)
 

"Goofy"
She's still pretty, even when doing an "ugly" face.


"The classic pig-nose"
Who hasn't tried making this funny face.


"Silly sisters"
My favourite! Blow 'em out, suck 'em in!
 
If you would like me to do a portrait of you, or as a gift for someone else, please contact me and we can discuss things further :)

Thursday 22 September 2011

Andy Warhol pop art

What do we think about pop art a la Andy Warhol?
I just found this photoshopped picture of me in a long lost file on my computer. 
I think I created it on a very boring day back in 2008. 
Guess where I got my inspiration from!?!


Tuesday 23 August 2011

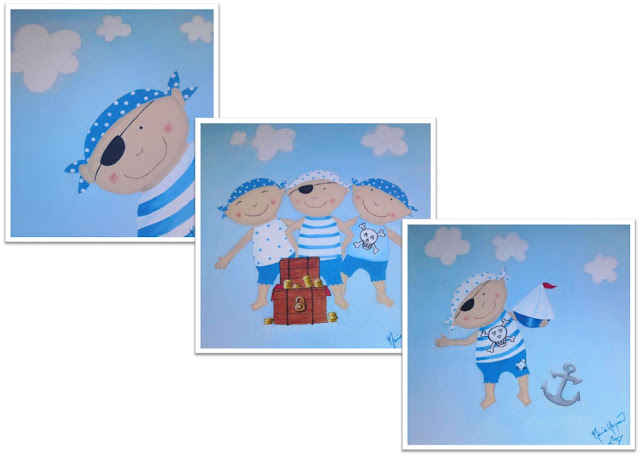
Argggh!! (pirate noise) - A look back to 2007...

I really haven't been creative enough lately - lazy me! I intended to paint the other day on a massive canvas I bought a few weeks ago, but I didn't have any motivation whatsoever. All I did was; I took a good sized plate from the kitchen, laid it on the canvas and drew around it so that it formed a ring. So now I've got a completely white canvas, with a penciled ring on it. Brilliant.... hum. I have actually planned to paint something special on that canvas. I can see it all in my head! I just need to pull myself together and actually paint it.

Oh well, you can't always keep up with your creativity. I was more creative a few years ago when people actually came to me and asked me to paint for them. I was once asked to paint some children's paintings of pirates for a little boy who was about 3 years old. You can see the result below. These paintings are from 2007. They're really simple, and of typical "boys colours". What little boy wouldn't want a few paintings of pirates on his wall ;)

Sunday 7 August 2011

Project: Painting a swirly tree on the wall (part 3)

The third and last part of my project where the goal was to paint a tree on the wall.
See below how it turned out!

After another 4 hours (so 8 hours in total) my swirly tree was finally finished!
It had been 8 long hours, with back pain and sore eyes, but it was absolutely worth it.
I am really happy with how it turned out.
Here are some closeups of the branches, just to tease you a little bit... :)
I promise you don't have to wait any longer now to see the completed tree. 
I know some of you have had to hear me talk about it for weeks, or even months!
So, my dear friends, have a look, and please let me know what you think of it:


Saturday 6 August 2011

Project: Painting a swirly tree on the wall (part 2)

I convinced my MD to lend me the company's projector over a weekend. It sure wasn't easy getting the settings and the size right, but with the help of my dear boyfriend it turned out just great.


Once I had drawn up the tree on the wall with a light pencil, I started painting the outlines of the tree with a tiny brush. It was quite difficult painting clean lines, and it took a lot longer than I thought it would.


After 4 hours I was half way there. Phew!!!

Related Posts Plugin for WordPress, Blogger...